Showing posts with label Tools. Show all posts

Monday, 7 April 2014

Lesson 8: Limiting the Scale tool, and other attributes

This week, a break from creating dynamic components with a look at the other attributes in the Component Attributes window. We have already seen many of them and most are self-explanatory but let's look at some of the others.

The group titled "Component Info" are all to do with what appears in the Component Options window. The position of the various attributes are shown below. You can also see a piece of italic text in the description and this is to show that you can use HTML codes in any of these areas. Only certain codes are available but they can make your text look more interesting and you can add links to your webpage, for instance.


Available HTML codes
    <a> anchor
    <b> bold
    <i> italic
    <u> underline
    <strong> bold
    <em> italic
    <p> paragraph
    <br> line break
    <ol> ordered list
    <ul> unordered lis
    <li> list item
    <font> font size, colour, etc

The "Form Design" group have similar uses. "ImageURL" allows you to replace the default thumbnail with your own image. The "DialogWidth" and "DialogHeight" determine the size of the Component Options window. (If you are working on a large screen, don't make the "DialogHeight" too large – remember other people will have smaller windows.)

The "Hidden" attribute simply hides or shows a subcomponent. This could be useful where, for example, you have a vehicle with different designs – a lorry that could be flat bed or enclosed. I also used it in a restaurant dining table/ chair set so that you could have variable options – one chair, two chairs opposite, two chairs side-by-side.

The final attribute "ScaleTool" is often used with dynamic components to disable or limit the use of the Scale tool with your component. As an example, imagine you have created a ladder that adds extra rungs as you lengthen it (increase the LenX). It would be all right for the Scale tool to be used to make the ladder longer but not to change the other dimensions (LenY or LenZ). That would distort the rungs and supports. With the ScaleTool attribute, you can disable some or all of the ways the Scale tool can be used.

To do so, double-click the "ScaleTool" attribute or click the menu-arrow icon to the right. The screen below appears.
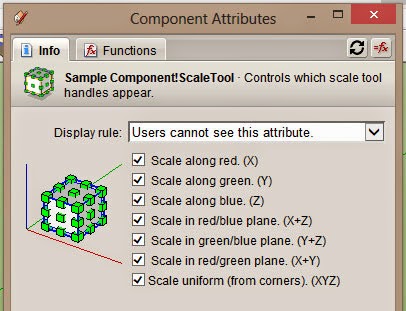

As you click on the checkboxes, you can see the handles appear and disappear meaning that the Scale tool cannot be used in that way. The easiest way to understand is to deselect some of the checkboxes, click apply, and then try to scale your component with the Scale tool. The setting below shows how the checkbox combination is mirrored when using the Scale tool.

Sunday, 9 March 2014

Lesson 1: Introduction to the DC tools and windows

We start then with an overview of the way you interact and create dynamic components (DCs)

(Remember that you must have the Pro version of SketchUp to create DCs although you can interact with existing ones with the free version).

There are four tools/windows used with DCs, three specifically and one, the scale tool, which can work differently with some DCs. These are shown below. (The dynamic component toolbar is opened from the View > Toolbars > Dynamic Components menu).

The menu and toolbar to access DC tools/windows
The only specifically-DC tool is the Interact tool (the pointing hand) which (depending on the component) will do certain things when clicked on the DC (such as open and close doors). The next button in the toolbar opens the "Component Options" windows which, again depending on the component, allows you to choose or enter various things (such as the width of a door). The third button opens the "Component Attributes" window which is what you use to actually turn a plain component into a dynamic one. The fourth button shown is the familiar Scale tool which can operate differently with some DCs.

As seen above, the "Component Options" and "Component Attributes" can also be opened from the Window menu and the right-click context menu.

Using the tools and windows

To see how the tools and windows work, go to the 3D Warehouse and download the simple DC figure called "Sang" (Direct link). Do not open directly (or it won't work) but create a new, empty SketchUp document and import it.

Now click on the Interact tool (the pointing hand) and hover it around the figure. You should see the cursor change over different areas as shown below. If you click on any active area, you should see the figure's colours change.


Now open the Component Options window while the Sang figure is selected. You should see something like this:


As you can see, this component gives you the option of changing the colours by entering the choice in the Component Options window (and clicking Apply). Some DCs can be changed via the Interact tool, some by the Options window, and some by both.

Finally open the Component Attributes window and you should see this:

This is where the formulas that define the "dynamic" part of the dynamic component are entered and we actually create the DC. This is also where it can get complicated so it is an area that needs to be taken slowly. For now, you should download a few more dynamic components and play around with them.

A sample of DCs is installed with SketchUp (in the Dynamic Components library in the Components window). You can see they are DCs by the little green icon beside the thumbnail (see below).

If you go to the 3D Warehouse, click on the little cogs in the search box at the top of the page. This takes you to the advanced search where there is a checkbox for "Show only dynamic models".